Sunday, January 19, 2014

Google Voice App on iOS

The Google Voice app on iOS allows you to send and receive text messages from a non-phone device, such as an iPod touch or iPad.

You can also start a phone call using your Google Voice number.  The app does not have the ability to make voice calls on its own.  Instead, it calls one of your "forwarding" phones.  When you answer, it connects you to the person you are trying to reach.  The advantages to placing a call this way are that long distance calls (in the United States) will be free and the person answering your call will see your Google Voice number on their caller ID.

  1. If you haven't already, create a Google Account and activate Google Voice.
  2. Install the Google Voice app on your iOS device.
  3. The first time you run the app, you will see a general welcome screen.


    Tap Sign In.
  4. You will be prompted to sign into your Google Account.


    Enter the e-mail address and password for your Google account, then tap Sign In.
  5. Your Google Voice inbox will appear.


    To send a text message, click Text in the upper right.
  6. You can now compose a text message.


    1. In the To box, enter a phone number.  Or tap the plus sign and select a recipient from your Google contacts.
    2. In the lower box, enter your message.
    3. Tap Send.
  7. You will return to your inbox.


    To place a phone call, tap on Dialer along the bottom.
  8. A dial pad will appear.


    Enter a phone number and tap Call.
  9. A list of your "forwarding" phones will appear.


    Tap on a phone number that you have access to at the moment.
  10. The app will say that it's calling you.


    When your phone rings, answer the call.  On the phone's receiver, you should hear the system ringing you person you were trying to reach.  From here out, it will be like a normal phone call.


Friday, January 17, 2014

Adding Google Voice to Your Google Account

Google Voice provides you with a free, virtual phone number.  You can send and receive texts from voice.google.com or using the Google Voice app on iOS or Android.  Calls to your Google Voice number can be configured to ring your work number during the day, your home phone at night, and your mobile number at all times.  Using Talkatone, a free app for iOS and Android, you can place and receive voice calls using your Google Voice number on non-phone devices, such as an iPod touch or Android tablet.  Long distance calls placed through your Google Voice number are free within the United States.
  1. Go to voice.google.com.


    Log in with your Google account.  (If you don't have one already, click Create An Account.)
  2. The Getting Started screen will appear.


    Check the box to accept the terms and privacy policy, then click Proceed.
  3. You can choose a new number for Google Voice (subject to availability) or port your mobile number.  For this example, we will choose a new number.  (If you port your mobile number, Google Voice would assume that phone number and your carrier would assign a new number to your mobile phone.)


    Click I Want a New Number.
  4. Before you can choose your number, Google Voice will make you add a forwarding phone number.


    Enter the number for a phone you have available at the moment, select the appropriate phone type, then click Continue.
  5. The Verifying Your Phone screen will appear.


    Click Call Me Now.
  6. Google will call your phone.  After you answer, a recorded message will ask you to enter the two digit verification code shown on your screen.


    Enter the code on your phone's dial pad to complete the verification process.
  7. You will now be allowed to search for a Google Voice number.


    To find a local number (not long distance from your home), enter your zip code, then click Search Numbers.  If Google Voice has no phone numbers for your zip code, try searching by area code.  At times, Google Voice may run out of phone numbers for an area.  Options include:
    • Wait.  In a few weeks, Google may acquire new numbers or reclaim some that are unused.
    • Select a phone number outside your area.  The drawback is that local callers will have to pay long distance rates.  If local numbers become available later, you can change by paying a $10 fee.
    • If you frequently place or receive long-distance calls for relatives or acquaintances in a distance city, pick a Google Voice number in their area.  Using your Google Voice number, the calls would all be "local" for both you and them.
    • Buy a cheap no-contract mobile phone, then return to step 3 and port your mobile number.  tracfone.com sometimes has deals on reconditioned phones with free airtime for as little as $20.  After porting your number, you can use the mobile phone until the service expires, then keep it for emergencies.  (Phones will no service can still call 911.)
  8. Five numbers from your search will display, with options to search again or view the next page of results.


    Select a phone number and click Continue.  (Looks like I'm moving to Beaver, Utah!  They've got Google Voice numbers.)
  9. You should see a Congratulations! message.


    Click Finish.
  10. You will go to your Google Voice inbox.


    To send a text message, click Text.
  11. A pop-up window will appear.


    1. In the To box, enter the phone number you want to send the text to.  If have phone numbers in your Google contacts, start typing a name and look for the person in the drop-down list. 
    2. In the Message box, enter your message.
    3. Click Send.
  12. You still have some important items left to configure.


    In the top right corner of the web page, click on the gear icon.


    From the menu, select Settings.
  13. The Phones tab of Settings will appear.


    Here you will find the phone numbers that Google Voice will forward your voice calls to.  To temporarily disable forwarding to a number, uncheck the box for that number.  To add additional numbers, click Add Another Phone at the bottom.  For more options, click the number's Edit button.
  14. Some basic options for the forwarding number will appear.


    Click Show Advanced Settings.


    From here you can control when calls will be forwarded to the number.  Click Use Custom Schedule.


    Now you can set specific time ranges.
  15. Along the top of the settings pane . . .


    Click on Voicemail & Text.
  16. Various options will appear.


    From here you can record your name and voice mail greeting.  If you check the Transcribe Voicemails and Email the Message To boxes, Google Voice will turn your caller's message into text and send it to you by e-mail.  The transcriptions are usually quite good.

Monday, January 13, 2014

Accepting a Google Drive Invitation for a Shared Folder

Google Drive is a great tool for sharing files with a group of people, without having to send them as e-mail attachments.  If someone shares a Google Drive folder with your non-Google e-mail address, Google will send you an invitation.  You can either create a new Google account or log in with an existing Google account, even if it uses an e-mail address different from the one the invitation was sent to.

  1. In your e-mail, open the invitation for the shared folder.


    Click on the link for the folder.
  2. You will be prompted to log into Google Drive.


    If you already have a Google account, using a different e-mail address, log in and skip to step 5.  If you don't have a Google account, click Create an Account.
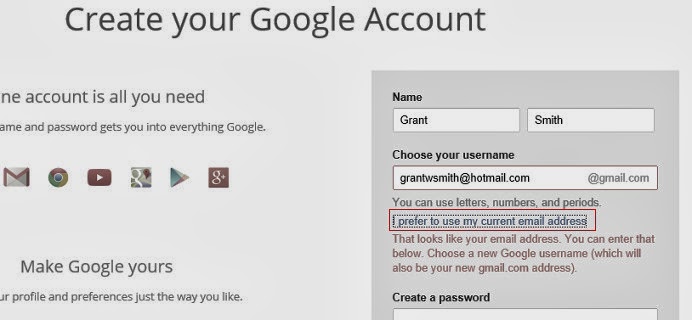
  3. A form will prompt you for information necessary to create your account.


    If you want to use your existing non-Google e-mail address, click the link I prefer to use my current email address.


    The form will reset and allow you to enter your non-Google e-mail address.
  4. If you are using a non-Google e-mail address, you will need to verify your address before your Google account is created.  For some mail providers, Google may send you an e-mail and ask you to click on a link in the message.  For others you may be prompted to log into the account in a web page and accept permissions.

    After verification is complete, you will be welcomed to your new Google Account.


    Click Back to Google Docs.
  5. The folder from the e-mail invitation will display.


    Click Add to Drive.
  6. The main page of Google Drive will load.  The shared folder should show up underneath My Drive.


    You can now access any files in the shared folder.


Sunday, January 12, 2014

Viewing Your lds.org Calendar in iOS

Members of the Church of Jesus Christ of Latter-Day Saints can view their ward's calendar by registering and logging into lds.org.  If you have an iOS device, you can also view the calendar in Apple's built-in Calendar app.


  1. Log into lds.org and go to the calendar.


    In the top right corner of the calendar, click on the gear icon.  From the drop-down menu, select Sync.
  2. You will see general instructions for syncing the calendar with Google Calendar, Microsoft Outlook, and Apple iCal.  Each of these includes the same URL for an iCal version of the calendar.  This URL is for your use only.  Treat it as a password and do not share it with others.


    Copy the URL.  You will need to find some way to transfer this to your iOS device.  The most common method is to paste it into an e-mail sent to yourself.
  3. On your iOS device, find the URL and copy it.  (Tap on the URL and hold.  You should see an option to select.  After selecting the text, you should see an option to copy.  If all else fails, ask a teenager for help.)
  4. Go to Settings.


    Select Mail, Contacts, Calendars.
  5. A list of existing accounts will display.


    Select Add Account.
  6. A list of account types will appear.


    Select Other.
  7. More options will be listed.


    Under Calendars, select Add Subscribed Calendar.
  8. You will be prompted to enter a server.


    Paste the URL you copied previously.  (To paste, tap in the field.  You should see the option to paste.)  When finished, tap Next.
  9. After the URL has been verified, additional lines of settings will appear.


    You may want to change the Description to make the calendar more easily identifiable in the list of your other calendars.  None of the other settings need to be changed.  Tap Save.
  10. You will return to your list of accounts.  The lds.org calendar will now display under the Subscribed Calendars section.

  11. Go to the Calendar app.


    Tap on Calendars at the bottom of the screen.
  12. A list of your calendars will display.


    In the Subscribed section, you should see your lds.org calendar.  Don't panic if it doesn't show up right away.  Just wait.  For whatever reason, it may takes this calendar a while to arrive.  Once it displays in the list, you can toggle the display of the calendar on and off by placing or removing the check mark.  When finished, tap Done.

    The lds.org calendar you see in the iOS Calendar app is a combination of all the lds.org calendars you are subscribed too.  On the lds.org web site or in the LDS Tools app, you will see various calendars for the ward and stake, each with a separate color.  In the iOS Calendar app, you will see all of them lumped together, with the same color.  But you can view it alongside your own personal calendar.

Opening a Shared Google Calendar in iOS

Google Calendar is a great tool for sharing information.  In this example, a Google account has been created so a group of people can access a private calendar.  Each member of the group is given the username and password so they can view the calendar.  If you have an iOS device, you can add this account and view the calendar using Apple's built-in Calendar app.  Since you may not want to clutter your calendar with this information all the time, you also need to know how to toggle the display of calendars on and off.


  1. On your iOS device, go to Settings.


    Select Mail, Contacts, Calendars.
  2. A list of exiting accounts will appear.


    Select Add Account.
  3. A list of account types will appear.


    Select Google.
  4. You will be prompted for information.


    In the Email and Password fields, enter the information you were given.  For Name and Description, enter something that will help you distinguish this account from others you have set up on your iOS device.  When finished, tap Next.
  5. The next screen allows you to pick which items you want to synchronize to your device.


    In this example, only the Calendars is shared.  Adjust the sliders to turn off synchronization for Mail, Contacts, and Notes.  When finished, tap Save.  The account has been added.
  6. To toggle display of calendars, go the Calendar app.


    Tap on Calendars.
  7. A list of your calendars will display.  If the new calendar does not appear in the list, wait and try again later.


    You can toggle the display of calendars by placing or removing the check mark in the first column.  When finished, tap Done.
  8. You should now be able to view the newly added calendar.